

Lesser-Known FFmpeg Tricks I Tested on Real Video Files
Why another FFmpeg post
Search for FFmpeg tips and you'll find the same list everywhere: convert a file, cut a clip, extract the audio, make a GIF. Those commands are useful, and I use them every day while building the video tools on this site. But FFmpeg can also show you how a video was put together, and it makes a few decisions for you that nobody warns you about.
This post covers the ones I actually use. I ran every command on FFmpeg 6.1.1 against two stock clips from Pexels: a 9.2-second 720p drone shot of a formal garden, and an 8.5-second 720p close-up of some printed cards. Every number below comes from those runs. If you want the background on I-frames, P-frames and B-frames first, my post on how video frames are stored explains them without any commands.
1. Draw the motion vectors on top of the video
When an encoder builds a P-frame or a B-frame, it mostly doesn't store pixels. It stores directions: "take this block from the previous frame and move it 6 pixels down." Those directions are called motion vectors, and FFmpeg can draw them for you.
ffmpeg -flags2 +export_mvs -i drone.mp4 -vf codecview=mv=pf+bf+bb -c:v libx264 -crf 18 vectors.mp4
-flags2 +export_mvs tells the decoder to hand the vectors over along with each frame, and the codecview filter draws them as arrows. pf shows the vectors in P-frames, while bf and bb show the forward and backward vectors in B-frames. If you only want one frame, add a select filter and save a PNG instead:
ffmpeg -flags2 +export_mvs -i drone.mp4 -vf "select=eq(n\,117),codecview=mv=pf" -frames:v 1 frame117.png

This picture explains the file size better than any chart. The drone is tilting, so the entire image shifts by roughly the same amount each frame. The encoder doesn't need to redraw the garden. It just records "everything moved down a bit" for each block. That's why, in this clip, an average P-frame takes about 102 KB while each of the two I-frames takes about 385 KB, and the B-frames in between average under 7 KB.
Two limits I ran into. It only works with FFmpeg's own software decoder, so leave out any -hwaccel option. And it works with H.264 and older MPEG codecs, but not HEVC: I encoded the same clip to H.265, ran the same command, and got a frame with no arrows at all.
2. List every keyframe without decoding the video
Knowing where the keyframes sit tells you where you can cut a video without re-encoding it. The command most people find online decodes every frame just to print its type:
ffprobe -v error -select_streams v:0 -show_entries frame=pict_type -of csv=p=0 video.mp4
On a 3-minute 720p file (the drone clip joined to itself 20 times), that took 32 seconds on the small 2-core machine I tested on. There are two faster ways. The first decodes only the keyframes and skips everything else:
ffprobe -v error -select_streams v:0 -skip_frame nokey -show_entries frame=pts_time -of csv=p=0 video.mp4
That took 1.7 seconds. The second doesn't decode anything. It reads the packet headers, where the container already marks each keyframe with a K flag:
ffprobe -v error -select_streams v:0 -show_entries packet=pts_time,flags -of csv=p=0 video.mp4 | grep K
That one finished in 0.16 seconds, about 200 times faster than the first command, and all three found the same 40 keyframes. I use the packet version whenever I'm about to make a lossless cut, for reasons trick 6 makes clear.
3. Measure what your keyframe interval costs
The -g option sets the maximum number of frames between keyframes. A lot of guides tell you to set it low, often to 1 or 2 seconds, without saying what that costs. So I encoded both clips five times at the same quality setting (libx264, CRF 23, preset medium) and changed only -g:
ffmpeg -i drone.mp4 -an -c:v libx264 -preset medium -crf 23 -g 15 g15.mp4
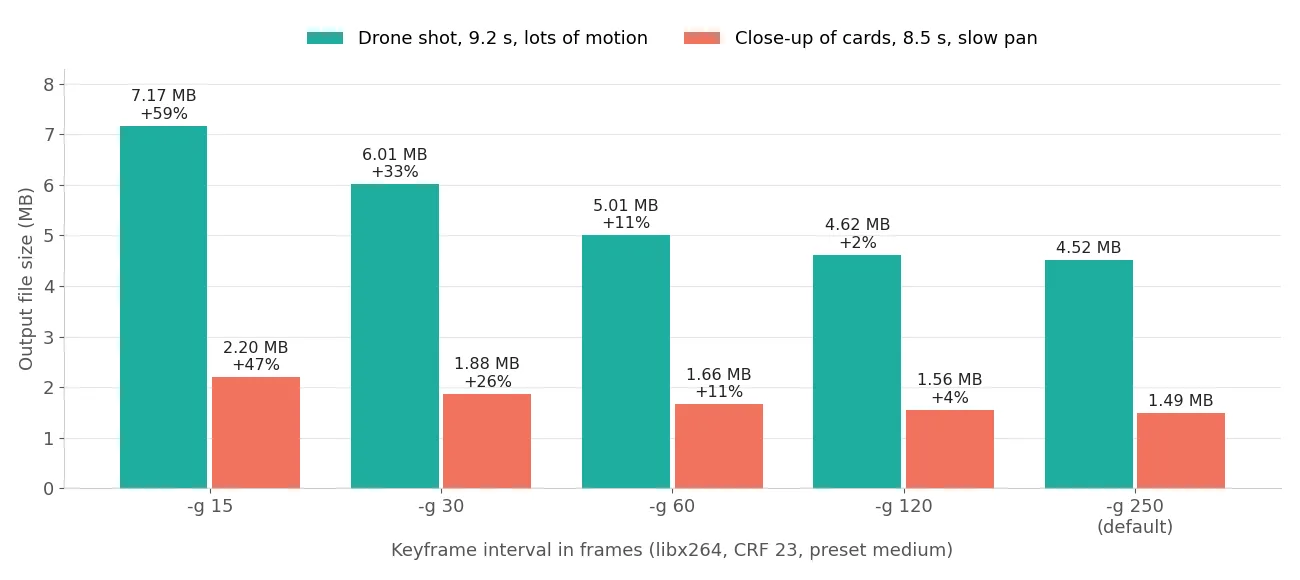
With a keyframe every 15 frames, the drone clip came out 59% bigger than with the default. The card clip came out 47% bigger. The quality barely moved: PSNR against the source stayed between 38.2 and 39.4 dB for the drone clip and between 44.8 and 44.9 dB for the cards. I then checked how the bytes were split. At -g 15, keyframes took up 70.5% of the drone file. At the default, they took up 12.7%.
You might wonder where the default of 250 comes from, since FFmpeg's own help text lists 12 for -g. The libx264 wrapper ignores that value and uses x264's default instead, and you can confirm it in the file itself with the next trick.
Short intervals do have real uses. Streaming formats like HLS need a keyframe at the start of every segment, and editing software scrubs faster with frequent keyframes. For a file you just want to store or send, though, leaving -g alone is the cheapest quality-per-byte decision you can make. My bitrate chart covers the other half of the size equation.
4. Read how someone else encoded a video
x264, the H.264 encoder behind FFmpeg, HandBrake and many other tools, writes its full list of settings into the video stream as plain text. ffprobe doesn't show it, but any tool that prints readable strings will:
strings video.mp4 | grep -m1 "x264 - core"
On Windows you can open the file in a hex editor and search for "x264". Both of my Pexels clips still carried the string, and they turned out to be encoded in very different ways:
| Setting | Drone clip | Card clip |
|---|---|---|
| Rate control | rc=crf crf=18.0, a fixed quality level | rc=2pass, two passes aiming at a bitrate |
| Keyframe interval | keyint=250 | keyint=infinite |
| Scene-change keyframes | scenecut=0, turned off | scenecut=40, the default |
| B-frames and references | bframes=3 ref=3 | bframes=3 ref=5 |
The drone clip's line explains its keyframes perfectly. The packet command from trick 2 finds exactly two, at 0 and 8.34 seconds. At 29.97 frames per second, 8.34 seconds is frame 250, and with scene detection switched off, x264 had no reason to add one anywhere else. That gap is also what makes trick 6 so surprising.
The card clip puzzled me. With keyint=infinite, I expected keyframes only at scene changes, but the packet command shows them at exactly 0, 3.03 and 6.07 seconds, every 91 frames. A scene-change detector doesn't produce a rhythm that regular. My best guess is that whoever encoded it forced keyframes from outside the encoder, which FFmpeg's -force_key_frames option does. The settings string can't show that, but the two commands together can.
This is also a quick way to see why a downloaded video is so large or so small, or to copy settings you like from someone else's encode. It only works for files encoded with x264 or x265 that still carry the string. A file made by a phone's hardware encoder or by a different encoder won't have it, and the command simply prints nothing.
5. Log every frame the encoder writes
FFmpeg 6.1 has an option that writes a line for every frame the encoder produces. Almost no tutorial mentions it, and it's the most direct way I know to see where the bytes go:
ffmpeg -i drone.mp4 -an -c:v libx264 -crf 23 -g 60 -stats_enc_post:v stats.txt -stats_enc_post_fmt:v "{n} {t} {size}" out.mp4
Each line holds the frame number, its timestamp and its size in bytes. When I sorted the log by size, the five biggest frames were numbers 240, 180, 60, 120 and 0, exactly every 60 frames, each between 250 and 300 KB. The median frame in the same file was about 3 KB. You can open the file in a spreadsheet and chart it, or run sort -k3 -n -r stats.txt | head to see the heaviest frames. There are matching options for the other end of the pipeline too: -stats_enc_pre logs frames going into the encoder and -stats_mux_pre logs packets going into the file.
6. The 2-second clip that weighs 5.8 MB
This is the one that fooled me the first time. I cut 2 seconds out of the drone clip without re-encoding:
ffmpeg -ss 3 -i drone.mp4 -t 2 -c copy cut.mp4
The whole 9.2-second source is 10.8 MB. The 2-second cut came out at 5.8 MB, more than half the original. So I counted what was inside:
ffprobe -v error -select_streams v:0 -count_packets -show_entries stream=nb_read_packets -of csv=p=0 cut.mp4
ffprobe -v error -select_streams v:0 -count_frames -show_entries stream=nb_read_frames -of csv=p=0 cut.mp4
The file stores 152 frames, but a normal decode only shows 62 of them. The source had keyframes at 0 and 8.34 seconds and nowhere in between. The frame at 3 seconds is a B-frame, and a file can't start on a predicted frame, so FFmpeg copied everything from the keyframe at 0 and added an edit list: a small instruction in the MP4 header that says "decode from the start, but begin showing at about 3 seconds."
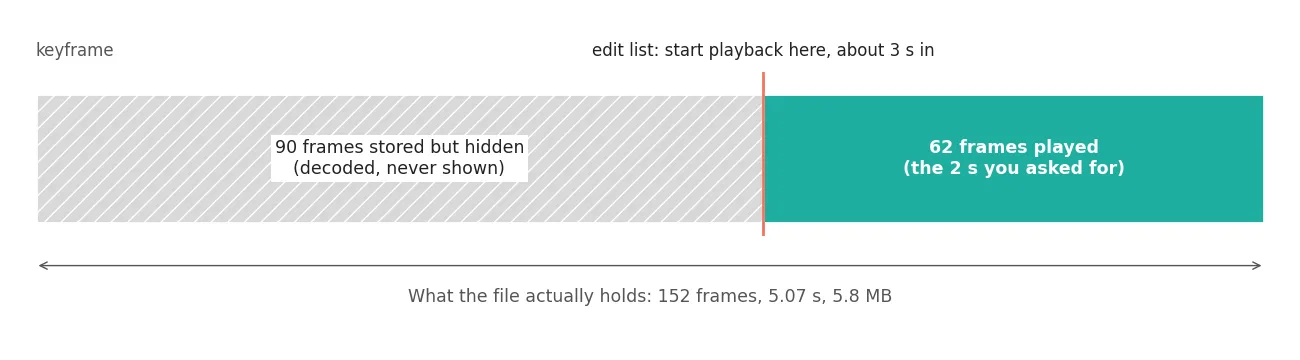
If you open the file with -ignore_editlist 1, ffprobe reports 5.07 seconds instead of 2.14. Players that read edit lists show the right 2 seconds. Players and editors that don't may show the 3 extra seconds, or a frozen frame at the start. Support really does vary: the developers of LosslessCut documented the problem and found that even Apple's players, which handle playback well, can misbehave when you scrub near the cut.
There are two clean ways around it. Use the packet command from trick 2, then start your cut exactly on a keyframe. Or accept one re-encode and get a frame-accurate cut with no hidden frames:
ffmpeg -ss 3 -i drone.mp4 -t 2 -c:v libx264 -crf 18 -c:a copy cut.mp4
7. FFmpeg picks your tracks, and not always the ones you'd guess
If you don't use -map, FFmpeg keeps one video track, one audio track and, sometimes, one subtitle track. The documentation says it picks the audio track with the most channels. My test showed that isn't the whole story.
I built an MKV with one video track, a stereo audio track called "Main mix", a 5.1 track called "Commentary", and English and Spanish subtitles. Then I converted it the way most people do:
ffmpeg -i movie.mkv -c copy movie.mp4
The MP4 had the video and the stereo main mix. Both subtitle tracks were gone, and FFmpeg printed no warning. The only hint was subtitle:0kB in the last line of output. The stereo track won even though the commentary had more channels, because the stereo track carried the "default" flag. When I cleared that flag on both audio tracks and ran the same command again, FFmpeg switched to the 5.1 commentary track. So a file with no default flags can quietly swap your main audio for a director's commentary or an audio description track.
The fix is to map everything and convert the subtitles to a format MP4 can hold:
ffmpeg -i movie.mkv -map 0 -c copy -c:s mov_text movie.mp4
That produced all five tracks. Whatever command you run, read the "Stream mapping" block FFmpeg prints before it starts. It lists exactly which input tracks go into the output, and it's the only place you'll see a track being left behind.
8. The recording date disappears
Phones store when and where a video was shot in the file's metadata. I made a test MOV carrying the same keys an iPhone writes: the recording time, the make and model, and a GPS position set to the Eiffel Tower. Then I remuxed it to MP4 with a plain -c copy, the same way my MOV to MP4 post does.
Everything was gone. The Apple keys were dropped, and so was creation_time, the standard recording date. FFmpeg removes creation_time on purpose unless you ask it to copy metadata yourself. Any app that sorts videos by when they were shot then has nothing to go on and may fall back to the date the file was created, which is the day you converted it.
Two options bring it back, and I needed both:
ffmpeg -i phone.mov -c copy -map_metadata 0 -movflags use_metadata_tags phone.mp4
-map_metadata 0 restored creation_time. -movflags use_metadata_tags restored the Apple keys, including the location. The same drop happened when I re-encoded instead of copying.
There is a privacy side to this. By default, FFmpeg stripped the GPS position from my test file, which is what you'd want before posting a video publicly. I still wouldn't count on it as a privacy tool. Run ffprobe -show_entries format_tags video.mp4 on the output and check for yourself.
All eight on one page
| What you want | Key option |
|---|---|
| See motion vectors | -flags2 +export_mvs with -vf codecview=mv=pf+bf+bb |
| List keyframes fast | -show_entries packet=pts_time,flags, then look for K |
| Control keyframe spacing | -g (libx264 defaults to 250) |
| See how a file was encoded | strings video.mp4 | grep "x264 - core" |
| Log size of every encoded frame | -stats_enc_post with -stats_enc_post_fmt |
| Check for hidden frames after a cut | Compare -count_packets with -count_frames |
| Keep every track | -map 0, plus -c:s mov_text for MP4 |
| Keep the recording date and phone metadata | -map_metadata 0 -movflags use_metadata_tags |
Frequently asked questions
Does -c copy ever lose quality?
No. Stream copy moves the compressed data into a new file without decoding it, so the picture and sound are bit-for-bit the same. What it can lose is everything around them: tracks FFmpeg didn't select and metadata it didn't copy. Tricks 7 and 8 cover both.
Why is my trimmed clip almost as big as the original?
If you trimmed with -c copy, FFmpeg had to start from the keyframe before your cut point and hide the extra frames with an edit list. Those frames still sit in the file. Compare -count_packets and -count_frames in ffprobe to see how many are hidden.
Can I see motion vectors in HEVC or AV1 files?
Not with codecview. It drew nothing when I tried it on an HEVC file. It works with H.264 and older MPEG codecs, so re-encode a short test clip to H.264 if you just want to see how the motion looks.
What keyframe interval should I use?
For a file you'll store or send, leave the encoder's default. For HLS or DASH streaming, match your segment length, which is often 2 seconds (-g 60 at 30fps). For editing proxies, go shorter so scrubbing stays snappy.
How do I keep all audio tracks and subtitles when converting?
Add -map 0 so FFmpeg takes every track from the input. For MP4 output, also add -c:s mov_text, because MP4 can't hold SRT or ASS subtitles directly.
Why does my converted video show up under today's date?
FFmpeg drops the creation_time tag by default, so apps that sort by recording date fall back to the file's own date. Add -map_metadata 0 to keep it, and -movflags use_metadata_tags for the extra keys phones write.
Do these commands work in FFmpeg 7 and 8?
I ran everything on FFmpeg 6.1.1. If an option errors out on your build, run ffmpeg -h full and search for it to see whether your version has it.